Technical Information
The Voltage Selector
Last updated January 23, 2003One of the annoying things about Hiwatts (and other "internationalized" valve amps of that era) is the ideosyncratic and hard-to-replace voltage selector plugs. This page explains how the Hiwatt one works, and a field-expedient replacement if it gets lost or broken.
NOTE: This socket exposes potentially LETHAL 250 volt potentials, even when the 110 volt setting is used, due to the autoformer effect present in the primary winding. Be very careful and heed all warnings described below.
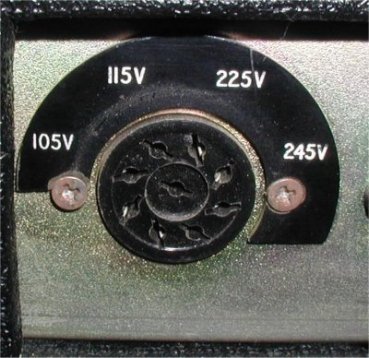
The voltage (and output impedance) selector sockets look deceptively like
an octal valve socket, but it's not. The main difference is these have a
ninth hole for a connector pin in the center, where a tube socket has the
larger keyed opening. This center pin is the common connection on both.

![]()
The plug has three pins in a row, which are all connected together:
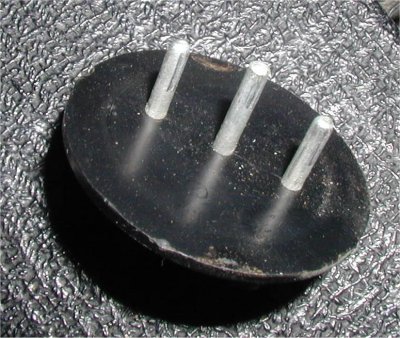
If you removed the plastic, the metal remaining looks like a capital E.
When inserted into the socket, it connects two opposite holes with the
center hole.
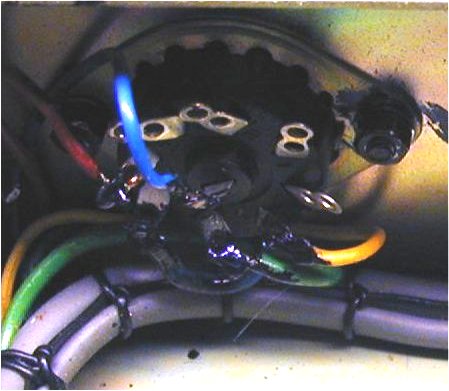
Here's an interior view. As you can see, four connections are not used.
This is fortunate, because it makes fashioning an emergency replacement
much easier. Note that this view "upside down", with the chassis up.
When the chassis is right side up, as in a head cabinet, it is the
bottom four holes that are unused.
All we need to do is connect the center hole to the appropriate one of
four holes above the center line.
First off, if you've lost your plug, and never travel with your amp to different countries, the best and safest route is to "hard wire" this connection internally to your local mains voltage setting. Hard-wiring is the safest and the most roadworthy solution. However, if you must change this setting on occasion, or if you're stuck in the field having just lost of broken your plug, this quick fix should help you out.
Here is a diagram of a functional replacement for a missing plug. It is
made of a short piece of solid-core insulated wire, of the type commonly
used to wire the AC mains in homes and offices (at least here in the
U.S.). It should be just wide enough to connect the center hole to one of
the outside holes.
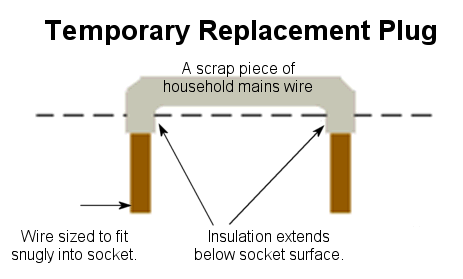
There are two important things to note. One is that the insulation MUST
extend "around the corner" on both bends as shown to keep dangerous mains
voltages from being exposed. The second is that the wire must be sized
for a snug fit into the socket hole or you'll have annoying intermittent
problems.
Once you've fashioned your replacement wire, plug it into the voltage selector socket, connecting the center hole to the hole with the appropriate voltage setting. With the chassis upright, this hole will be one of the four above the center line. Looking from the back, the voltages for the four holes are as shown in the pictures above, going left to right from lowest to highest.
AFter you've verified that it works, use some electrical tape to hold the wire in place and cover any unused holes.
Hiwatt Tech Page
Main Hiwatt Page